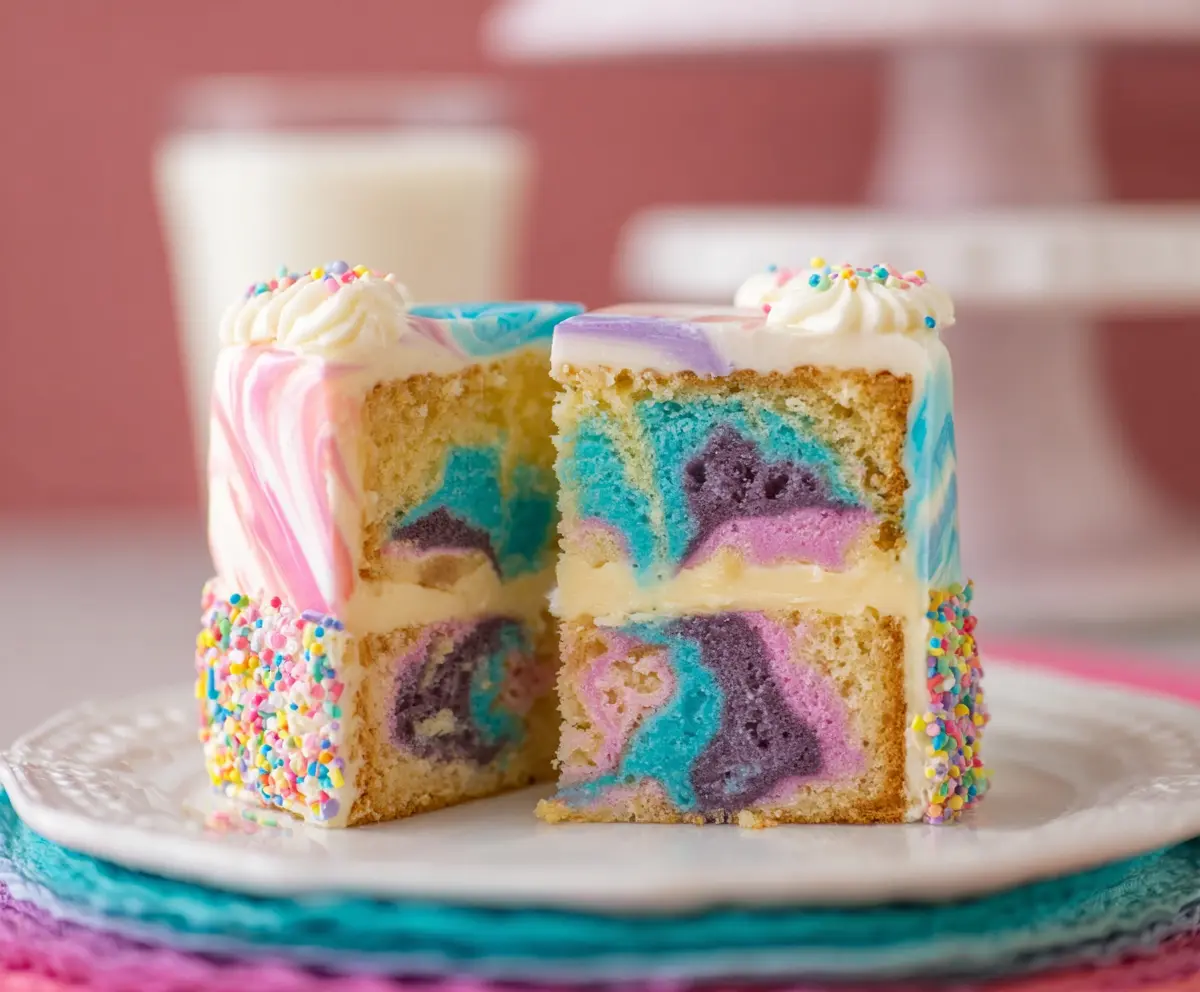
This Swirled Easter Cake is a fun, colorful treat that looks as good as it tastes! With yummy layers of fluffy cake and vibrant swirls, it brings joy to any celebration.
Perfect for Easter gatherings, this cake has a sweet buttercream frosting that makes each slice a delight. I can’t help but sneak a piece during the decorating—it’s just too tempting! 🎉
Key Ingredients & Substitutions
All-Purpose Flour: This is the base for your cake, giving it structure. You could swap with cake flour for a lighter texture or a gluten-free blend if you’re avoiding gluten.
Unsalted Butter: This adds richness. If you’re out, you can use margarine or coconut oil, though it may change the flavor slightly. For a dairy-free option, try vegan butter.
Granulated Sugar: Essential for sweetness and texture. You could substitute with brown sugar for a deeper flavor or use coconut sugar for a healthier twist, but it will affect color and texture.
Whole Milk: This makes the batter moist. If you want a lower-fat option, use skim milk or a plant-based milk like almond or oat. Just keep in mind that it can alter the taste slightly.
Food Coloring: It creates that fun swirl effect! If you prefer natural options, try vegetable juices like beet juice for pink, blueberry juice for blue, or spinach for green.
How Do I Get the Perfect Swirl Effect?
Creating a beautiful swirl in your cake can feel tricky, but with a few simple steps, you’ll nail it! The key is to layer the colored batters carefully. Use the back of a spoon to add dollops of each color, alternating between them.
- Don’t overmix when swirling! A gentle stir with a skewer or knife is all you need to create the effect.
- Think of making a figure-eight pattern; this will blend the colors without losing the distinct swirl look.
- Make sure to leave some batter in each bowl so you can have a good color contrast in the pan.
And remember, practice makes perfect! Your first attempt might not be exactly how you envision, but it’ll still taste great!
How to Make a Swirled Easter Cake
Ingredients You’ll Need:
For the Cake:
- 2 1/2 cups all-purpose flour
- 2 1/2 teaspoons baking powder
- 1/2 teaspoon salt
- 1 cup unsalted butter, softened
- 1 3/4 cups granulated sugar
- 4 large eggs
- 1 tablespoon vanilla extract
- 1 cup whole milk
- Food coloring (pink, purple, blue)
For the Filling and Frosting:
- 1 1/2 cups unsalted butter, softened
- 4 cups powdered sugar
- 1/4 cup heavy cream
- 1 tablespoon vanilla extract
- Pinch of salt
Decoration:
- Multi-colored sprinkles
How Much Time Will You Need?
You’ll need about 1 hour for prep time and another 30-35 minutes for baking. After that, let the cake cool completely (around 30 minutes) before frosting it. For the best results, chill the cake in the fridge for 30 minutes after decorating. So plan on about 2 hours total before you can dig in—worth the wait!
Step-by-Step Instructions:
1. Prepping the Oven and Pans:
Start by preheating your oven to 350°F (175°C). Prepare two 8-inch round cake pans by greasing them with butter or shortening and dusting them with flour to prevent sticking. Set them aside while you make the batter.
2. Mixing Dry Ingredients:
In a medium bowl, whisk together the all-purpose flour, baking powder, and salt. This will ensure even distribution of the baking powder and that your cake rises perfectly. Once mixed, set this bowl aside.
3. Creaming Butter and Sugar:
In a large mixing bowl, use an electric mixer to cream the softened butter and granulated sugar together for about 3-5 minutes, until the mixture is light and fluffy. This step helps to incorporate air into your batter, giving the cake a nice rise.
4. Adding Eggs and Vanilla:
Add the eggs one at a time, mixing well after each addition so everything is combined nicely. Then, stir in the vanilla extract for that lovely flavor!
5. Combining Everything:
Now, it’s time to add your dry ingredients! Alternately mix in the flour mixture and the milk, starting and ending with the flour. Mix just until everything is combined; don’t overmix!
6. Preparing the Colored Batters:
Divide the cake batter evenly into three bowls. Add a few drops of pink food coloring to the first bowl, purple to the second, and blue to the third. Gently fold each color until mixed well but still vibrant.
7. Creating the Swirl Effect:
Scoop alternating dollops of each colored batter into the prepared cake pans. Use a skewer or a knife to lightly swirl the batter together. Just a few movements is all you need—too much stirring will mix the colors too much, and we want those beautiful swirls!
8. Baking the Cakes:
Place the pans in the preheated oven and bake for 30-35 minutes, or until a toothpick inserted into the center comes out clean. Once baked, let the cakes cool in their pans for about 10 minutes, then gently turn them out onto wire racks to cool completely.
9. Making the Frosting:
While the cakes are cooling, make the frosting. Beat the softened butter in a large bowl until creamy. Gradually add the powdered sugar, mixing well after each addition. Then add vanilla extract, pinch of salt, and heavy cream. Beat this on high speed for about 3-4 minutes until it’s light, fluffy, and smooth. Adjust the consistency with more cream or sugar as needed.
10. Assembling the Cake:
Once the cakes are completely cool, you can level the tops if they’ve domed. Place one layer on your serving plate and spread a generous layer of frosting on top. Then, place the second layer on top of that and frost the entire outside of the cake smoothly.
11. Decorating the Cake:
Use the remaining frosting to pipe decorations, such as rosettes or swirls, on the edges of the cake. Add a sprinkling of multi-colored sprinkles on the lower sides for a fun, festive touch!
12. Chilling Before Serving:
To help the frosting set nicely, chill the decorated cake in the refrigerator for at least 30 minutes before serving. This way, it holds together better when you cut into it.
Enjoy your vibrant and festive Swirled Easter Cake with family and friends! Perfect for celebrating any spring occasion or just brightening up your day.
Can I Use Different Colors of Food Coloring?
Absolutely! Feel free to use any colors you like for a fun twist. You can even create pastel shades by using less coloring or mixing them together. Just make sure they are gel or liquid food colors for the best results!
Can I Make This Cake Gluten-Free?
Yes, you can substitute the all-purpose flour with a gluten-free baking blend that measures cup-for-cup with regular flour. Just ensure it’s a good quality blend to keep the texture light and fluffy!
How Should I Store Leftover Cake?
Store any leftover cake in an airtight container in the refrigerator for up to 3-4 days. If you want to keep it longer, you can freeze it! Wrap the cake in plastic wrap and then foil, and it will last for about 2-3 months.
Can I Make This Cake in Advance?
Definitely! You can bake the cake layers a day or two ahead of time and store them tightly wrapped in the fridge. Then, frost and decorate when you’re ready to serve! This can actually enhance the flavors as they sit together.