
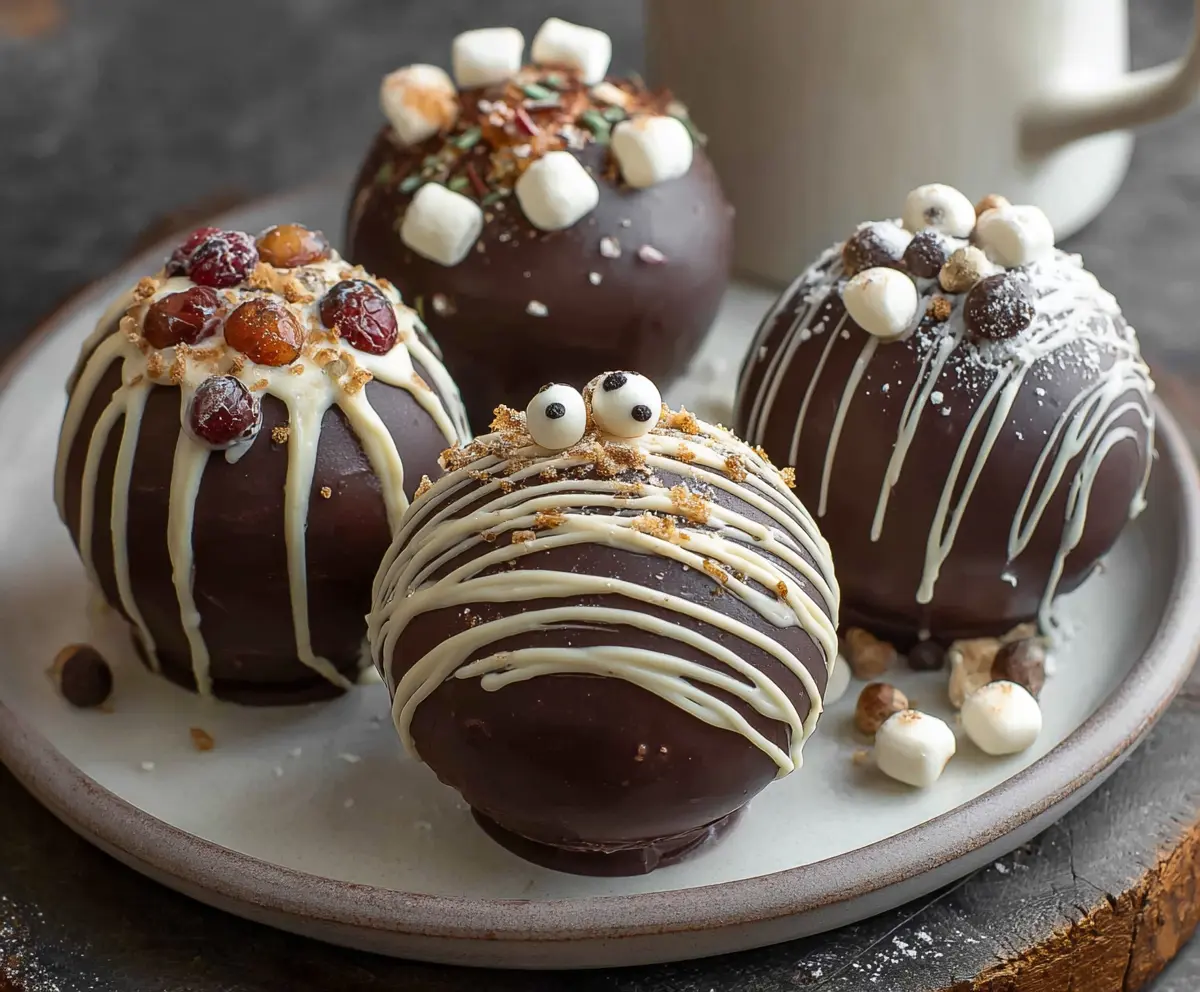
Hot Chocolate Bombs are a fun way to enjoy hot chocolate. These chocolate spheres are filled with cocoa mix and marshmallows, waiting to melt into warm milk!
They’re like a gift for your cup! Just drop one in hot milk, watch the magic, and have a delicious treat. I love making these for cozy nights in—so easy and tasty! ☕️❤️
Key Ingredients & Substitutions
Dark Chocolate: Use high-quality chocolate for the best flavor. If you prefer, semi-sweet or milk chocolate also works! For a dairy-free option, try dark chocolate that’s dairy-free or a vegan chocolate replacement.
Hot Cocoa Mix: You can use store-bought cocoa mix or make your own with cocoa powder and sugar. Those who avoid sugar can swap with a sugar substitute. I love adding a pinch of salt to enhance the chocolate flavor!
Mini Marshmallows: If you want a healthier version, try using dehydrated fruit or chocolate-covered nuts instead. Vegan options are available too. My favorite is to mix in flavored marshmallows for a twist!
Decorations: Use any colored candy melts or icing you have. If you can’t find them, chocolate chips or crushed candies can also add fun color and texture. Get creative with what you have at home!
How Do You Make Perfectly Sealed Hot Chocolate Bombs?
Sealing hot chocolate bombs can be tricky without them breaking! Here are a few tips to ensure you don’t face any mishaps:
- Ensure both chocolate halves are fully set before sealing. If they aren’t firm, they can break when you handle them.
- Melting the edges of the chocolate spheres gently on a warm surface is key; don’t overheat, or the chocolate will melt too much!
- Press firmly but gently to seal the halves. If they aren’t sticking, let them chill longer to firm up.
Taking your time at this step will lead you to beautifully made hot chocolate bombs that won’t leak when you pour your milk!
How to Make Decorative Hot Chocolate Bombs
Ingredients You’ll Need:
- 12 oz (340g) high-quality dark chocolate or semi-sweet chocolate, chopped or in chips
- 1 cup hot cocoa mix
- 1/2 cup mini marshmallows
- White chocolate for drizzling and decoration
- Colored candy melts or icing (blue, gold, and other colors) for decoration
- Small edible candy pearls or decorations (gold balls, tiny sprinkles)
- White chocolate or fondant for small decorative toppers
- Mini chocolate chips or tiny edible beads for eyes and details on toppers
How Much Time Will You Need?
This recipe takes about 30 minutes of active preparation time, plus 30-45 minutes for chilling. So, you can expect to spend roughly an hour to an hour and a half from start to finish. It’s a fun and engaging kitchen project that results in delightful treats for yourself or to share with friends and family!
Step-by-Step Instructions:
1. Melt the Chocolate:
Melt the dark chocolate gently using a double boiler or microwave in 30-second bursts, stirring well until smooth. Be patient; you want it perfectly melted without burning.
2. Form Half-Spheres:
Using a silicone sphere mold (about 3 inches in diameter), pour the melted chocolate into each cavity, coating the inside evenly. Tilt the mold to cover the sides fully, then scrape out excess chocolate from the top edges. Refrigerate for 10-15 minutes until set. If you want a sturdier shell, repeat the coating process with a second layer of chocolate, chilling again.
3. Prepare the Filling:
In a bowl, mix together the hot cocoa mix and mini marshmallows. For a special touch, you could also add small candy bits or flavorings, like crushed peppermint, to enhance the flavor!
4. Fill the Half-Spheres:
Once the chocolate shells are firm, gently pop the half-spheres out of the molds. Fill each half-sphere with 1-2 tablespoons of your hot cocoa/marshmallow mix.
5. Seal the Bomb:
Warm a baking tray in the oven at low heat or use a warm plate. Take an empty chocolate half-sphere, and melt its rim gently by placing it briefly on the warm surface. Quickly position it on top of the filled half-sphere, pressing the edges together to seal. Chill again to set completely.
6. Decorate the Bombs:
Melt some white chocolate for drizzling, then use a spoon or piping bag to create fun stripes or swirls over the bombs. You can also use colored candy melts or icing to pipe decorations, like lace patterns or festive designs. Add edible gold balls and sprinkles for that extra flair!
7. Create Decorative Toppers:
Form small heads out of white chocolate or white fondant. For eyes and features, use mini chocolate chips or edible beads. Attach these cute toppers onto the bombs with a little melted chocolate to secure if needed. Add even more personality with colored icing for hair or hats.
8. Serve and Enjoy:
To use your beautiful hot chocolate bombs, simply place one in a mug. Pour hot milk over it and watch it melt, releasing the cocoa mix and marshmallows for a rich, creamy hot chocolate. Stir to combine and enjoy! Perfect for chilly evenings!
This recipe creates charming, gourmet hot chocolate bombs that are not only a treat for the taste buds but a feast for the eyes too. Have fun customizing your decorations for different occasions! 🎉🍫
Can I Use White Chocolate for the Shells?
Yes, you can! White chocolate works well, but keep in mind that it has a different flavor profile. If you choose white chocolate, consider adding a pinch of salt to enhance its sweetness.
How Long Do Hot Chocolate Bombs Last?
Hot chocolate bombs can be stored in an airtight container at room temperature for up to 2 weeks. If you live in a very warm climate, consider refrigerating them to prevent melting!
Can I Customize the Filling?
Absolutely! Feel free to get creative with the fillings. You can swap the mini marshmallows for other treats like crushed peppermint, caramel bits, or flavored marshmallows for a unique twist.
What’s the Best Way to Serve Hot Chocolate Bombs?
To serve, simply place a hot chocolate bomb into a mug and pour hot milk over it. Stir well once it melts to mix all the delicious ingredients together. Enjoy your creamy hot chocolate creation!